Forcepoint ONE
Jump toSingle-vendor SASE.
Industry-leading data security.
Bring data security everywhere to empower productivity anywhere. Secure access to the web, cloud and private apps and get continuous control over data with Forcepoint ONE.


Forcepoint ONE Features and Benefits
Forcepoint ONE Use Cases

Modernize Access for the Hybrid World
Networking gets a security upgrade with SASE. Forcepoint ONE pairs with FlexEdge Secure SD-WAN to modernize access in two critical ways: support for offices and remote sites and empowering the secure use of BYOD and unmanaged devices. As a result, organizations enjoy healthy application performance and secure access to SaaS and private apps.
Brochure

Adopt Zero Trust Principles with Ease
Deliver identity-based access control on any device, including contractors and guests, to follow the Zero Trust principle of least privilege. Take web security a step further with Zero Trust web access, powered by Secure Web Gateway, Remote Browser Isolation and Zero Trust CDR to ensure any website visit or any file download is safe.
Analyst Report

Secure Data Everywhere it Goes
Create a data security policy once and apply it everywhere data goes with a few simple clicks, saving your team hours in productivity. Forcepoint DLP integrates with Forcepoint ONE Security Service Edge (SSE) channels to enable organizations to easily extend their security policies across web, cloud and private applications in just a few minutes.
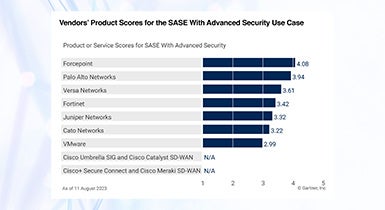
Use Case

Track Economic Value and Security Posture in Real Time
Forcepoint ONE includes the Insights analytics platform, which visualizes economic value creation in real time from thwarted cyber threats. Instantly see how much value your data security program generates across cloud, web and private app channels.
Infographics
Forcepoint ONE enables a modular approach to SASE.
Deploy what you need, when you need it, with all the benefits of total integration.


Learn More About Forcepoint ONE and SASE
Data-First SASE Resources